

How To Upload An Excel To Office 365
This browser is no longer supported.
Upgrade to Microsoft Edge to take advantage of the latest features, security updates, and technical support.
Load data from Office 365 by using Azure Data Factory
APPLIES TO:  Azure Data Factory Azure Synapse Analytics
This article shows y'all how to use the Data Factory load data from Function 365 into Azure Blob storage. You lot can follow like steps to copy information to Azure Data Lake Gen1 or Gen2. Refer to Part 365 connector article on copying data from Office 365 in general.
Create a data mill
-
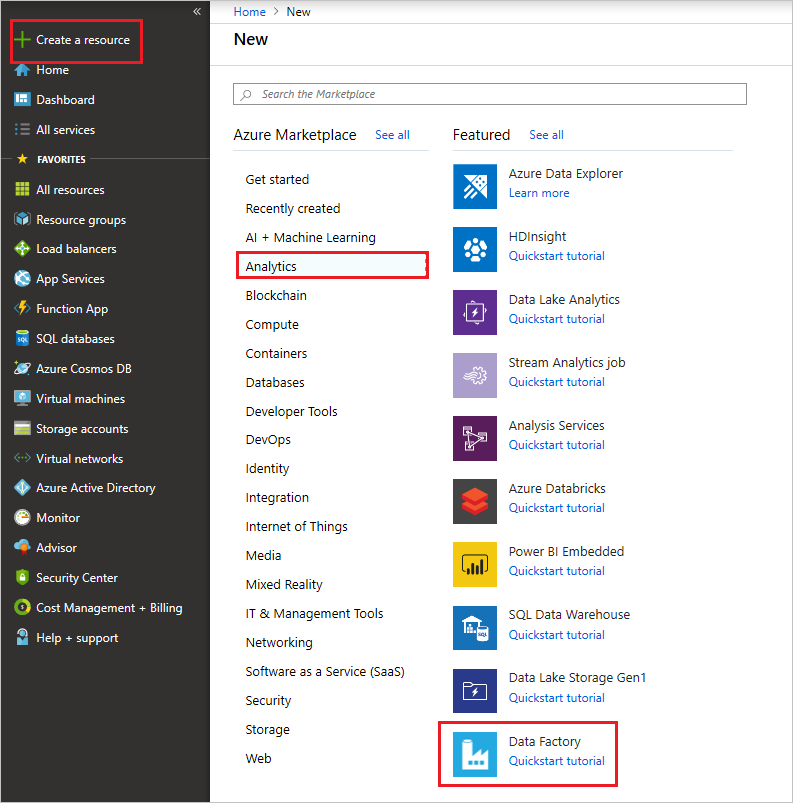
On the left menu, select Create a resource > Analytics > Information Manufacturing plant:
-
In the New data manufacturing plant page, provide values for the fields that are shown in the post-obit image:

- Name: Enter a globally unique name for your Azure information factory. If you receive the error "Data factory name LoadFromOffice365Demo is not available", enter a different name for the information factory. For example, you could employ the name yourname LoadFromOffice365Demo. Try creating the data factory again. For the naming rules for Data Factory artifacts, see Information Factory naming rules.
- Subscription: Select your Azure subscription in which to create the data factory.
- Resource Group: Select an existing resource group from the drop-downward list, or select the Create new selection and enter the proper name of a resource grouping. To learn about resource groups, run across Using resource groups to manage your Azure resources.
- Version: Select V2.
- Location: Select the location for the data manufacturing plant. Only supported locations are displayed in the drop-downward listing. The data stores that are used by information factory can be in other locations and regions. These data stores include Azure Data Lake Store, Azure Storage, Azure SQL Database, and then on.
-
Select Create.
-
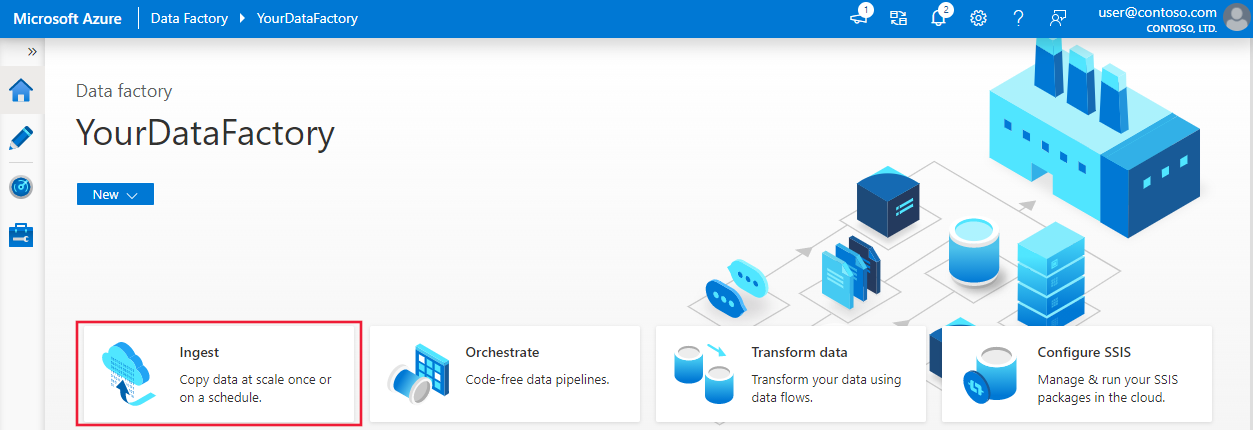
Subsequently creation is complete, go to your information factory. You see the Information Factory home page as shown in the following image:

-
Select Open on the Open Azure Information Factory Studio tile to launch the Data Integration Application in a separate tab.
Create a pipeline
-
On the dwelling house page, select Orchestrate.
-
In the General tab for the pipeline, enter "CopyPipeline" for Name of the pipeline.
-
In the Activities tool box > Motion & Transform category > drag and drib the Copy activity from the tool box to the pipeline designer surface. Specify "CopyFromOffice365ToBlob" as activeness name.
Note
Please utilize Azure integration runtime in both source and sink linked services. The self-hosted integration runtime and the managed virtual network integration runtime are not supported.
Configure source
-
Go to the pipeline > Source tab, click + New to create a source dataset.
-
In the New Dataset window, select Office 365, and then select Continue.
-
You are at present in the copy activeness configuration tab. Click on the Edit button next to the Office 365 dataset to go on the data configuration.

-
Yous encounter a new tab opened for Role 365 dataset. In the General tab at the bottom of the Backdrop window, enter "SourceOffice365Dataset" for Name.
-
Go to the Connection tab of the Properties window. Next to the Linked service text box, click + New.
-
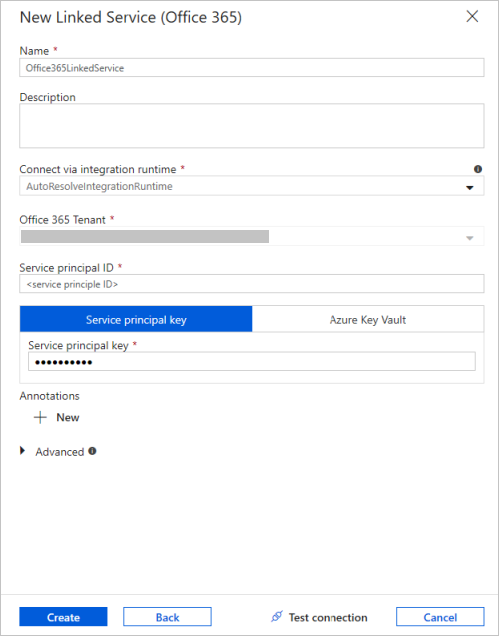
In the New Linked Service window, enter "Office365LinkedService" as name, enter the service principal ID and service main key, then exam connection and select Create to deploy the linked service.
-
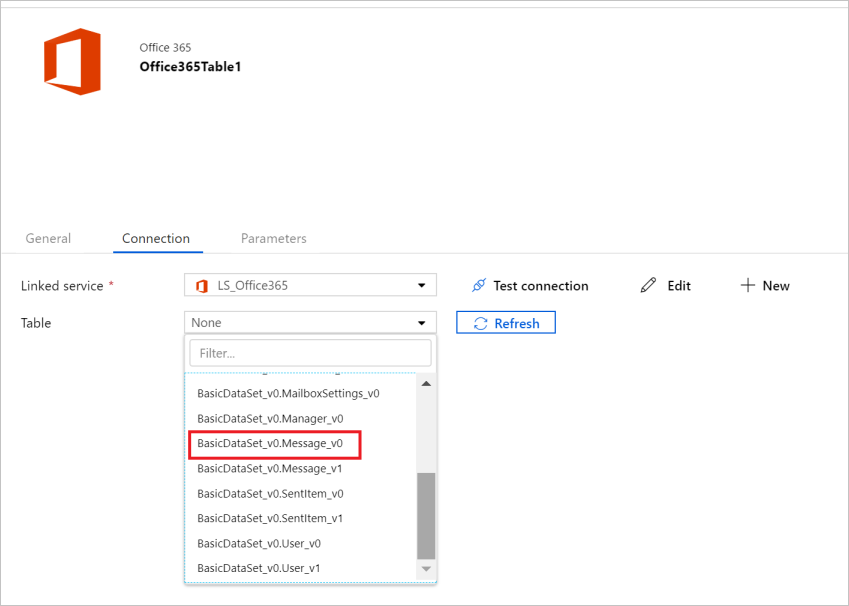
After the linked service is created, you lot are dorsum in the dataset settings. Next to Table, cull the downwards-arrow to expand the list of available Function 365 datasets, and cull "BasicDataSet_v0.Message_v0" from the driblet-downward list:
-
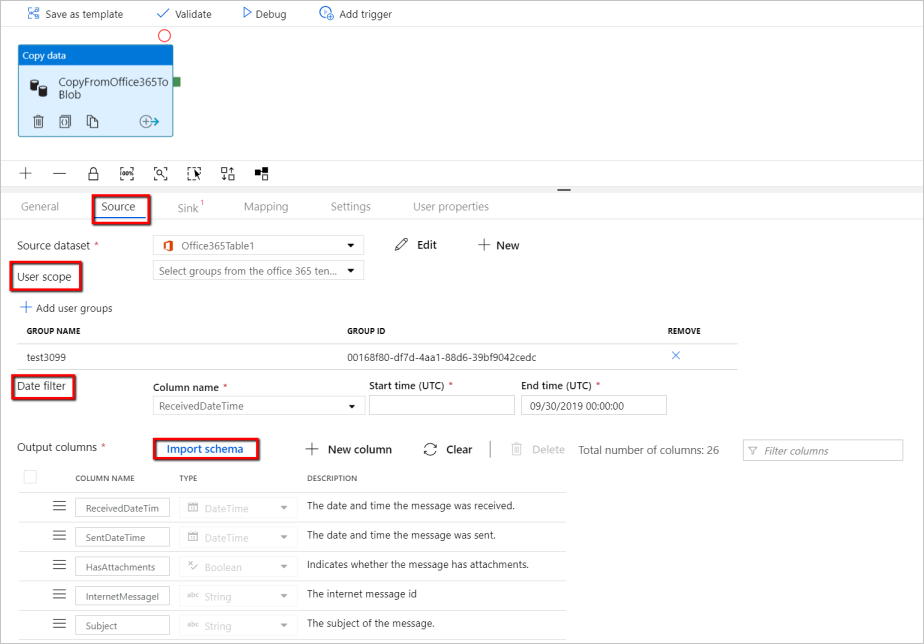
Now go back to the pipeline > Source tab to go along configuring additional backdrop for Function 365 data extraction. User scope and user scope filter are optional predicates that you can define to restrict the data you want to extract out of Office 365. See Part 365 dataset properties department for how you configure these settings.
-
You are required to choose 1 of the appointment filters and provide the start time and end time values.
-
Click on the Import Schema tab to import the schema for Message dataset.
Configure sink
-
Get to the pipeline > Sink tab, and select + New to create a sink dataset.
-
In the New Dataset window, notice that but the supported destinations are selected when copying from Office 365. Select Azure Blob Storage, select Binary format, and and then select Continue. In this tutorial, you copy Function 365 data into an Azure Hulk Storage.
-
Click on Edit button next to the Azure Blob Storage dataset to continue the data configuration.
-
On the General tab of the Properties window, in Name, enter "OutputBlobDataset".
-
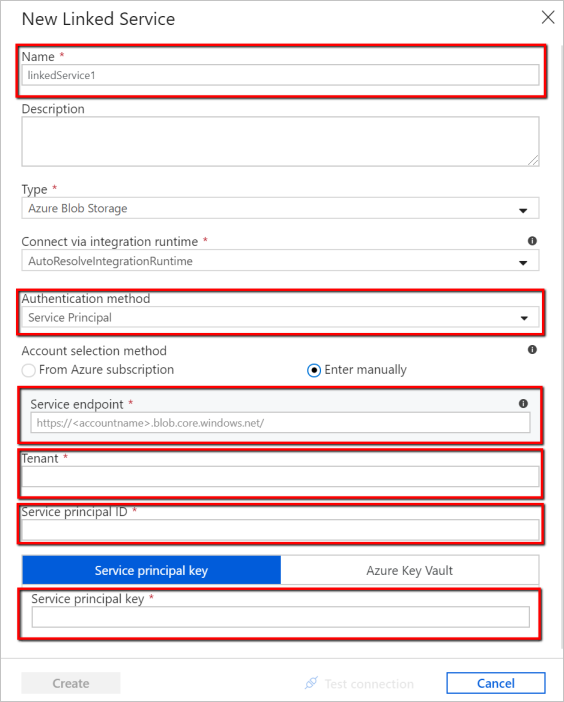
Go to the Connection tab of the Properties window. Next to the Linked service text box, select + New.
-
In the New Linked Service window, enter "AzureStorageLinkedService" every bit proper noun, select "Service Principal" from the dropdown list of authentication methods, fill in the Service Endpoint, Tenant, Service primary ID, and Service principal key, and so select Save to deploy the linked service. Refer hither for how to set up service principal authentication for Azure Blob Storage.
Validate the pipeline
To validate the pipeline, select Validate from the tool bar.
You can as well see the JSON code associated with the pipeline by clicking Lawmaking on the upper-right.
Publish the pipeline
In the pinnacle toolbar, select Publish All. This activeness publishes entities (datasets, and pipelines) you created to Data Factory.

Trigger the pipeline manually
Select Add Trigger on the toolbar, and so select Trigger At present. On the Pipeline Run page, select Finish.
Monitor the pipeline
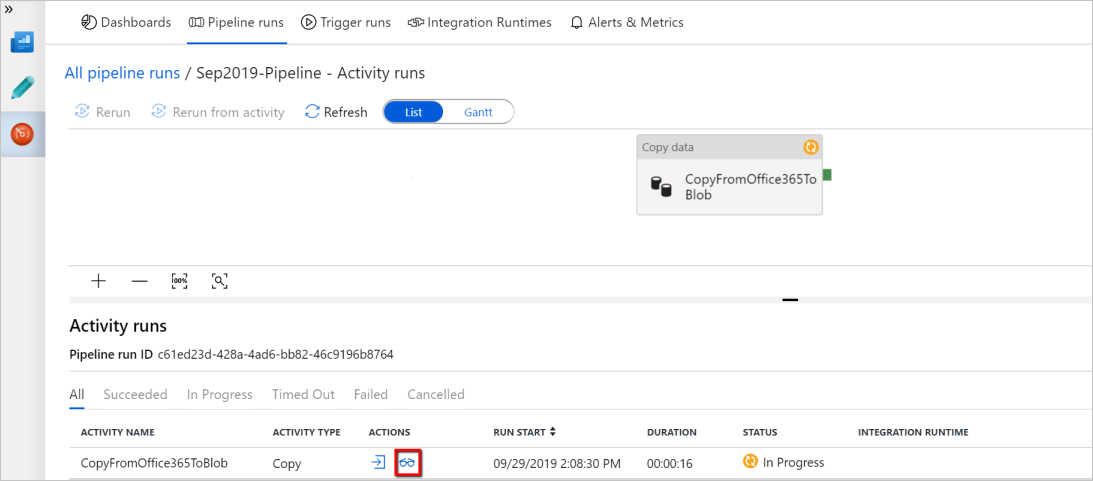
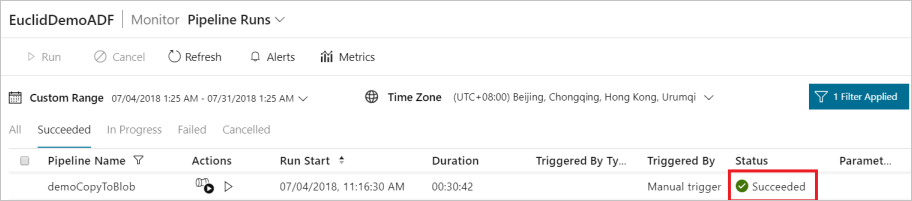
Go to the Monitor tab on the left. You see a pipeline run that is triggered by a manual trigger. You can apply links in the Actions cavalcade to view activity details and to rerun the pipeline.

To see activeness runs associated with the pipeline run, select the View Activity Runs link in the Actions column. In this example, there is only one activity, so you lot see simply one entry in the listing. For details about the re-create performance, select the Details link (eyeglasses icon) in the Actions column.
If this is the first time you lot are requesting data for this context (a combination of which information table is being access, which destination business relationship is the information being loaded into, and which user identity is making the data admission request), you volition run across the copy activity status as In Progress, and merely when you click into "Details" link under Deportment will you lot run across the status as RequesetingConsent. A fellow member of the information access approver grouping needs to corroborate the request in the Privileged Access Management before the data extraction tin proceed.
Status as requesting consent: 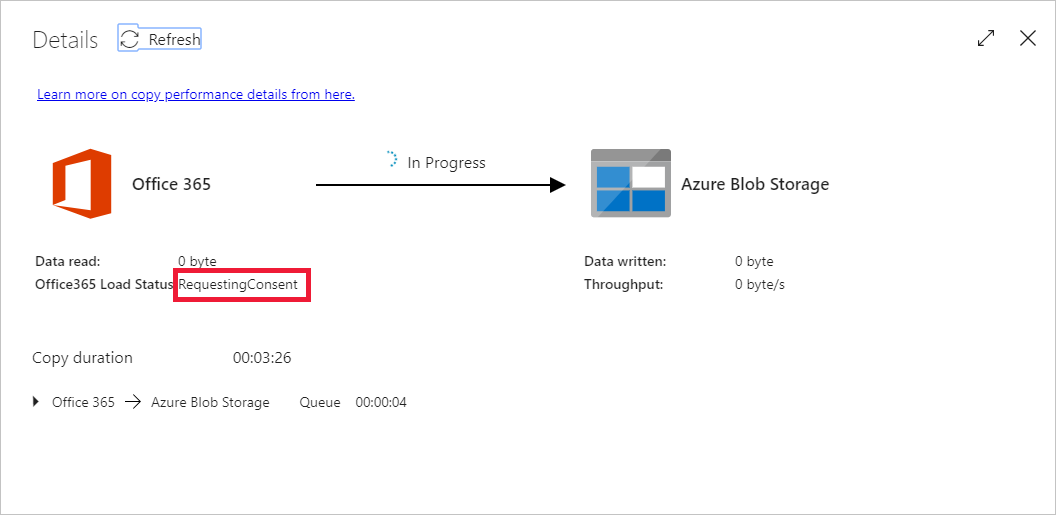
Status equally extracting data:
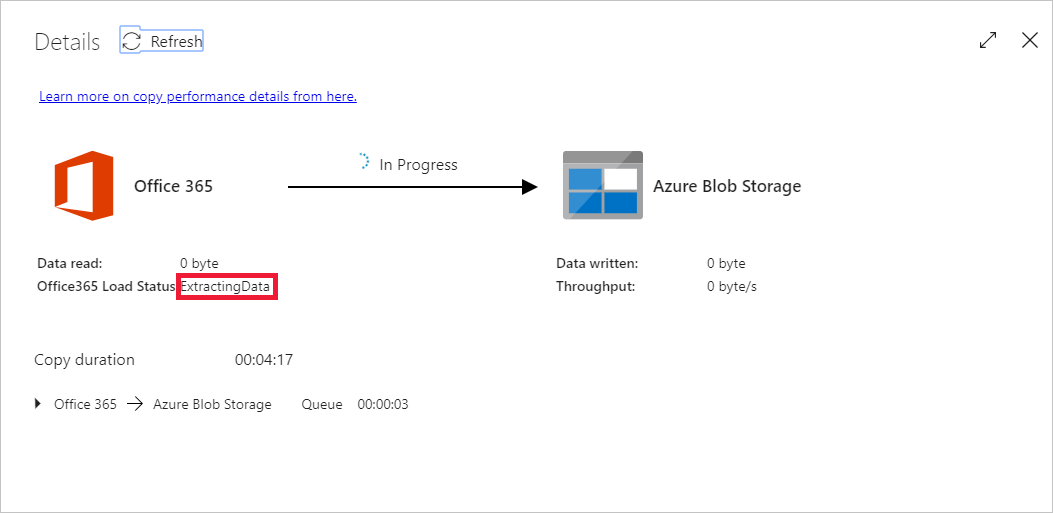
In one case the consent is provided, information extraction will continue and, after some time, the pipeline run will prove as succeeded.
At present get to the destination Azure Blob Storage and verify that Office 365 information has been extracted in Binary format.
Next steps
Advance to the post-obit article to learn about Azure Synapse Analytics support:
Feedback
Submit and view feedback for
Source: https://docs.microsoft.com/en-us/azure/data-factory/load-office-365-data
Posted by: purdyequaringer.blogspot.com
0 Response to "How To Upload An Excel To Office 365"
Post a Comment